Ever lost vacation photos or crucial documents because a memory card failed? Flash memory wears out: every write/erase cycle chips away at the card’s endurance. The SD Association says a quality SD card should last around 10 years (roughly 10,000 writes), but in practice a single power glitch or bend can corrupt it immediately. The one silver lining is that file deletion isn’t always final… experts say you have a 70–90% chance to recover lost files. Still, I’d rather not trust fate with my files. Here’s how I safeguard and rescue them:
Common Reasons Memory Cards Fail
- Limited lifespan & bad blocks: Flash cells degrade with each use. Pulling the card out during a write or a power loss can create unreadable “bad blocks” that wreck the file system.
- Physical fragility: Cards are tiny and delicate. A small drop, bend, or even a hot day can fry the electronics. Always use a protective case.
- Counterfeit or cheap cards: Fake SD/microSD cards are surprisingly common. For example, a card might claim 512GB but only have 64GB inside. Cheap cards often have quality issues or early failures.
- Malware and computer errors: Plugging a card into a virus-infected device can expose it to malware. Viruses or bad drivers may scramble or erase your files without warning.
- Manufacturer defects: Sometimes cards fail through no obvious fault of yours. According to the SD Association, modern memory cards can typically endure around 100,000 write cycles under normal use in their lifetime. This occurs due to wear leveling technology in their controllers that evenly distributes data writes to maximize card longevity. However, a mass-produced flash chip with a hidden flaw can give up out of the blue, often without any sign until it’s too late
Step 1: Check the Basics – Card and Reader
When a card seems dead, start with some simple checks:
- Inspect the card: Look at the gold contacts (the metal connectors on the memory card). Are they dirty or scratched? Gently clean them with a dry, lint-free cloth. Check the plastic… any cracks or bending?
- Try a different reader or port: The problem might be your card reader or USB port. If you have another card reader or a different USB cable, try that instead.
- Use Disk Utility: On your Mac, open Disk Utility (in Applications > Utilities). Does the card appear under External drives? If it’s there (even grayed out), select it. You may see options to Mount it or run First Aid (next step). If it still doesn’t show up at all, the card may be physically dead. But if it appears, proceed to repair it with the macOS tool given below.
Step 2: Run Disk Utility First Aid
macOS includes a disk-repair tool that might fix logical errors:
- First Aid: In Disk Utility, select the card and click First Aid. Let it scan and repair the file system.
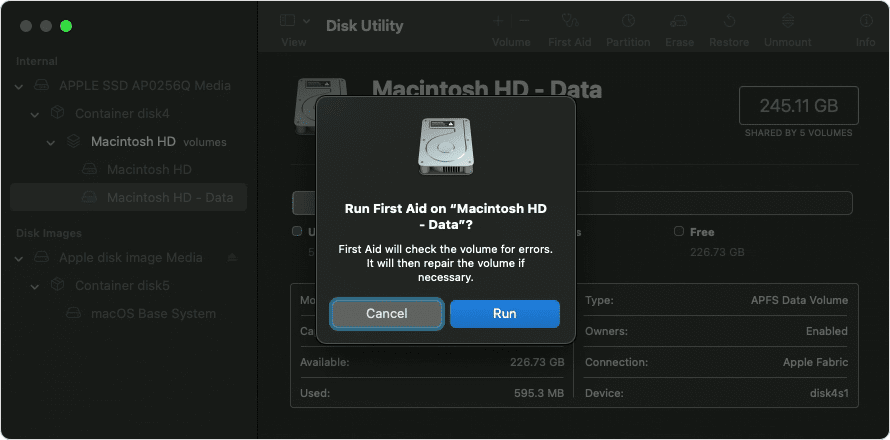
- Decline formatting: If macOS prompts you to format or erase the card, always click Cancel. Formatting will destroy your data. Instead, note any error messages.
- Recover if it mounts: If First Aid succeeds (even partially), the card should mount and appear in Finder. Immediately copy any important files off the card. If First Aid reports it can’t repair the card, stop using it now and go to the next step.
Even a partial fix is enough to let you save files. The moment the card is readable, back up its contents to your Mac or another drive.
Step 3: Recover Data with Data Recovery Software
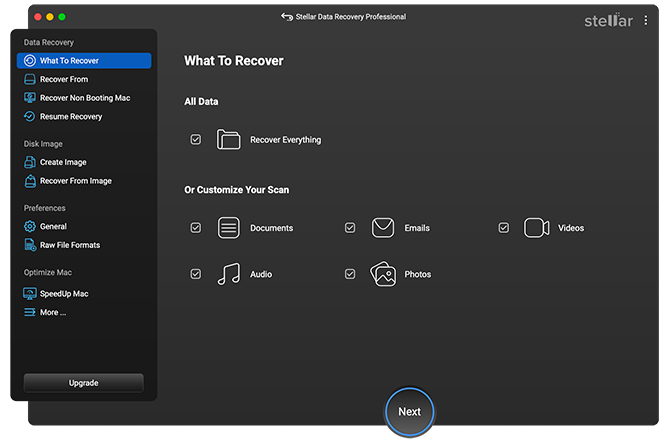
When built-in tools can’t do it, try a specialized Mac recovery app. One of the best options in the market is Stellar Data Recovery Professional for Mac, a DIY Mac data recovery app. Let’s see how you can do it:
- Stop using the card: Remove the card from your device and don’t save anything new to it. This maximizes your chance of recovery.
- Choose what to recover: It can scan formatted or corrupt drives. Start by choosing what you want to recover. It can be a specific kind of a file or an entire folder. It supports APFS, HFS+, exFAT and more. It can run a deep scan of the card even if macOS won’t mount it.
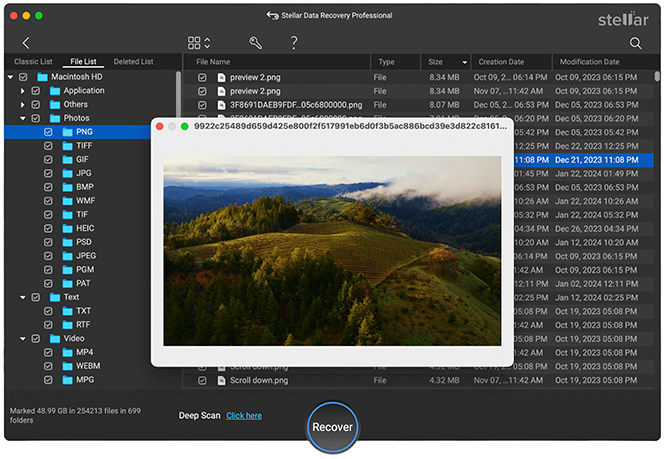
- Choose the drive and deep scan the card: In the app, select the memory card and choose a thorough scan. This will take longer but can find files that quick scans miss.

- Preview and restore: Once the scan finishes, browse the recoverable images, videos, documents, etc. Preview them in the app to confirm they’re intact. Then select the files you want and click Recover to add them back to a folder on your Mac’s drive (never to the same card). You can see what’s recoverable for free in the trial version, and only purchase the software if it finds your needed files.
This way, you rescue your data without overwriting anything on the card. Mac recovery apps often boast 70–90% success rates for deleted files. It’s not magic, but it often works surprisingly well if you act fast.
Step 4: Preventing Future Heartaches
The best strategy to get yourself covered is never to let yourself lose data in the first place:
- Keep backups: You can always use those Time Machine or cloud storage options to and readily back up your important files. Treat the memory card as a temporary transfer medium not your one and only… well storage.
- Use redundant storage: If your camera has got two slots save each photo to both. Otherwise keep two cards and alternate between them so you never depend on just one of them.
- Buy reputable cards: Sticking to major brands and official retailers is a key here. A recognised brand is more trustworthy than a bargain-bin and no-name card.
- Eject safely and handle carefully: You keep forgetting this but ejecting cards via Finder before removing them is actually wise. Store those cards of yours in anti-static cases, and avoid heat, water or magnets.
- Rotate old cards: If a card has seen heavy use in its hard life and is a few years old, its better to retire it rather than risk it. Reports suggest flash media eventually wears out with time and replacing an aging card is cheap insurance to be honest.
Memory cards are handy, but remember: they’re more like ticking time bombs than permanent vaults. Always assume your card will fail eventually, and keep copies elsewhere.
If disaster strikes, try a Mac File Recovery Software for restoring lost or deleted files that runs on all Mac computers and supports the latest macOS versions. It will list any salvageable photos and documents from your card and let you pull them back. You can even try its free trial first to see if it finds your lost files, and then upgrade to the full version when you’re ready to recover them. There’s no need to send the card to a lab unless it’s physically broken.
Conclusion
In short, never trust a single memory card with your only copy of something important. Be extra careful when your kind hands are handling and backing up, and remember… always use macOS tools to check for errors. If, by chance, you end up with a corrupted or accidentally formatted card, try a tried and tested recovery solution right away. Trust me, spending a few minutes on precautions right now is much easier than dealing with lost photos or documents later.


