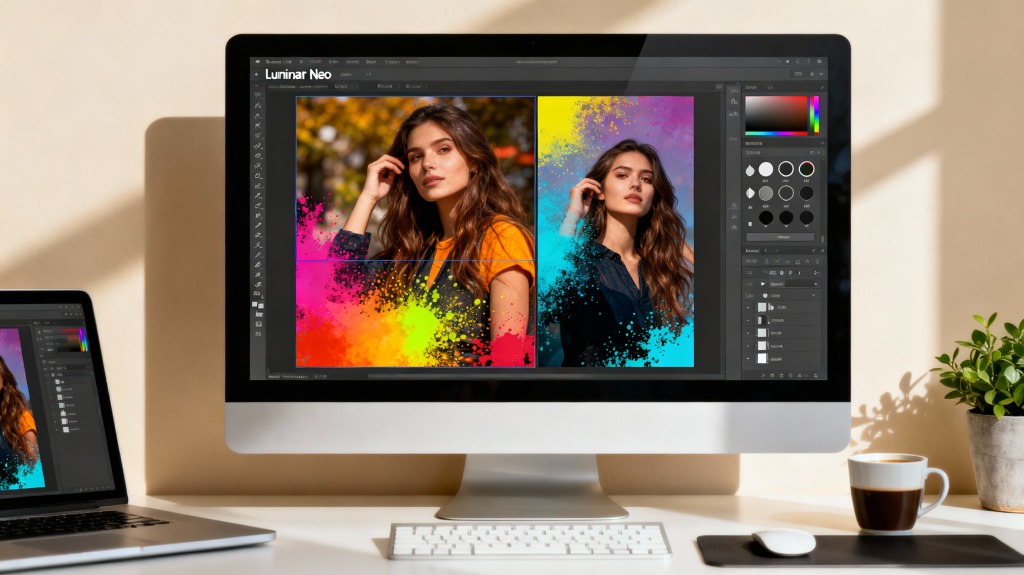
Creative image editing is no longer about pushing every slider and hoping for a magical result. It is a focused process: establish a clean baseline, guide attention with subtle local changes, and add personality without breaking realism. Photo editing software like Luminar Neo helps you do it fast.
In this guide, we explain how to edit pictures creatively with Luminar Neo. We offer you a clear path from a neutral baseline to a distinctive style. You can repeat these moves on any project to let your creativity shine.
Step 1: Set the Base
Import the image you want to edit into Luminar Neo and navigate to the Edit tab. Start by adjusting the exposure and setting the overall brightness. Tweak the Contrast slider for a visual punch. If you want a dramatic and moody picture, high contrast can work in your favor.
Highlights and Shadows sliders are your best friends for recovering detail. If the bright clouds are blown out, drag the Highlights slider down to bring back texture. If the trees in the foreground appear dark and muddy, adjust the Shadows slider to the right to reveal hidden details without flattening the image.
An inaccurate white balance can make a lovely sunset look sickly green or a snowscape appear unnaturally yellow. Click on a neutral gray or white area with an eyedropper to set the neutral starting point. One of the key photo editing tips for managing tonal inconsistencies is to adjust the Temperature and Tint sliders until the colors appear realistic.
Step 2: Use AI Tools
Luminar Neo is renowned for its powerful AI-based photo editing tools. For instance, Sky AI won’t let the dull and flat sky ruin your perfect composition. Instead, it allows users to emphasize the intended mood with a vibrant sunset or stormy clouds in a few clicks. AI automatically detects the horizon, masks the objects in the foreground, and flawlessly blends the new sky into the scene. The lighting in the new sky should match the existing lighting direction to make the edits look natural.
Even if you are unfamiliar with photo editing techniques that may help you address the illumination inconsistencies, Luminar Neo includes Relight AI to help you with it. It intelligently adjusts the exposure and color of your original landscape or portrait. As you integrate new creative elements, return to this tool periodically to ensure your image remains properly and evenly lit.
Step 3: Experiment with Overlays
You can further personalize your look by incorporating artistic elements, such as using various digital overlays for edits that help you achieve stunning effects. Overlays are transparent images that contain elements such as dust, scratches, rain, or cinematic effects. Integrating these allows you to add a vintage look, a stormy atmosphere, or a soft, misty quality. Experiment with different blending modes to make your picture bolder or more realistic, depending on the intended style.
Luminar Neo supports layers, allowing users to stack multiple overlays and textures. For example, you might add a subtle scratch texture layer to mimic an old print, then place a soft light-leak layer on top to create an aged feel.
Step 4: Guide the Viewer’s Eye
The best way to edit photos involves guiding viewers to where to look first without visually overwhelming them. The Dodge & Burn tool allows you to selectively lighten (dodge) or darken (burn) areas of your photograph.
Darkening the edges of the frame (vignetting) and lightening the subject’s face or the main element can make your picture bold, dramatic, and impactful. Dodging and burning can create a 3D effect, making the visual experience more interesting and dynamic.
In portraits, you can define the focal point by softening the background. The Portrait Bokeh AI tool in Luminar Neo intelligently identifies your subject and selectively blurs the background to enhance your portrait with a dreamy, bokeh effect. You can change the intensity and size of the blur to achieve a look similar to that of an expensive portrait lens.
Use the Details tool in Luminar Neo. Instead of applying global sharpening to the entire picture, you can use the sliders to enhance small, medium, and large details specifically. For instance, you might improve small details to bring out the texture of bark or fabric, but leave the large details alone to prevent noise in smooth areas, such as the sky.
Step 5: Export the Results
If your photograph is intended for print, you will need a high-resolution file (such as TIFF or a high-quality JPEG) in a wide color space (like Adobe RGB). A standard JPEG with a 2048-pixel long edge works well for websites and social media. Always check that the final output maintains the stunning detail and color fidelity you achieved during the editing process.
In 2025, Luminar Neo introduces a convenient and cost-effective solution for photo sharing called Spaces. It comes with a perpetual Max plan and has no storage limit. Just select the photos, click the “Publish to Space” button, type the name of your gallery, and click “Publish” to start the exporting process. Once it is complete, you can copy the link to your gallery to share it with clients or post it online.
Conclusion
Luminar Neo offers an accessible yet powerful set of photo editing tools that condense complex photo editing techniques into simple, AI-driven sliders. It means less time struggling with masks and layers and more time focusing on your creative vision. Don’t be afraid to experiment. Try out new styles, apply multiple color grades, and blend artistic elements until you find a unique style that truly speaks to you.


